
Introduction
This 5 minute video is a great introduction to your first orienteering event. It’s presented by Graham Gristwood, a top class orienteer and former member of Mole Valley Orienteering Club.
Finding an event to try
Orienteering events are organised by clubs but anyone can attend an event to try it out without being a member of that club (or any club). Club members will happily answer any questions and will help you get started. Some events you have to sign up to in advance (often through platforms such as racesignup.co.uk or sientries.co.uk), but some events permit entry on the day.
To find out about events and training activities, our listings compile events from clubs across the UK (and internationally) and Mole Valley’s training activities for beginners, improvers and juniors. To see events on a map try British Orienteering’s map or alternatively Ollie O’Brien’s map.
A variety of terrains are used for orienteering events, so choose one you enjoy. Most traditional orienteering is in forests, but there are also urban events (either as simple ‘street orienteering’ which often uses a simplified map, or as an ‘urban’ event using a fully detailed map). Some events also distinguish by course length: long distance, middle distance, and sprints. There are also relay events, and the discipline of night orienteering: not for the faint hearted!
Events vary by size too: ranging from small local try it out events, through ‘regional’ events, and to ‘national’ and ‘major’ events. The largest events are attended by thousands of competitors.
Permanent Orienteering Courses are also a great way to go orienteering at a time and place that suits you. Mole Valley has a number of permanent orienteering courses in local parks described here.
Choosing a course at an event
Orienteering courses vary in both their length and their technical difficulty.
Linear courses are typically named with a colour to indicate this. ‘White’, ‘Yellow’ and ‘Orange’ courses are designed for complete beginners. These courses are usually short with checkpoints on paths or visible from the path. Green, blue, brown, and black courses are harder and get longer and are only recommended if you have some experience.

Course distances are generally measured in a straight line from Control to Control. Therefore they may seem relatively short, particularly if you’re an established runner. But the more technically difficult courses involve routes cross country (through undergrowth, crossing streams etc.) rather than along paths, and there will almost always be hills to climb. Hence, you will almost certainly travel further than the course length suggests, and will typically be travelling slower (but not necessarily with less effort!) than if your normal running speed.
Score courses are available at some events. In a score event, you choose which controls to visit in the time limit.
What kit do I need?
Clothing: Orienteers usually wear a lightweight (not cotton) top and leggings. As a newcomer, just be dressed ready for an outdoor activity prepared to run or walk as you choose. Full leg cover is compulsory for events in woodland or forest, whilst shorts are fine in most urban events. Expect you might get wet and muddy, so a change of clothes for when you finish is a good idea.
Footwear: For forest orienteering, shoes with good grip will help, though trainers are fine at first. Expect them to get muddy and wet, depending on the time of year! Regular road running trainers are suitable for urban orienteering.
Compass: Yes! You may be able to borrow one for your first event.
Timing chip: your time from the start, via each control, and to the finish is recorded using an electronic timing chip called a “dibber”. These can be hired at each event. Once you start attending regularly you’ll find it more cost-effective to buy your own.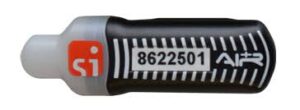
For street-orienteering: we use an app called MapRun for recording our street orienteering events. To participate in such events, you’ll need a smartphone with this app loaded, or a compatible watch (certain Garmins) with the app and event loaded.
Reading orienteering maps
Maps for orienteering events are detailed. Very detailed! To the degree that individual (significant) boulders, trees and knolls can be mapped.
Scale. They are produced at a larger scale than most Ordnance Survey maps: often using scales of 1:10,000 for forest orienteering and 1:5,000 for urban orienteering. 1:10,000 means 1 cm on the map represents 100m on the ground.
Symbols. The maps include very detailed information about the terrain using many symbols. You certainly don’t need to know these when you start but it is useful to know the symbols for tracks and paths, walls and fences, and water features (blue) such as streams and ditches.
Colours. The key thing for a beginner is to take note of the colours. Orienteering maps use different colour schemes compared to if you’re used to Ordnance Survey maps. The video linked to at the top of this page includes an overview of orienteering maps at ~1 minute in to the video. Open land (e.g. fields) is shaded yellow and forest that is easy to run through is shown as white. Forest that is a bit thicker is shown as light green. After that, the thicker the forest the darker the green. Most orienteering maps will also provide a detailed legend to help you understand the map.
Arriving at the event and the start
There will be an information or enquires area or tent to visit when you arrive. If not pre-entered, you can register for the event here. It is also a good place to ask someone to help you understand what to do and give general advice.
Unless you have your own, you will need to hire an electronic timing device – a “dibber” – from the registration team. With this, together with your compass, you can make your way to the start, where you’ll be directed to “clear” the dibber of its previously recorded data, and to “check” this has happened in a second box.
Starting and completing the course
The start: Orienteering races rarely have mass starts. Competitors typically start at least a minute apart per course. At local events you can often just turn up and start when you are ready. At larger events, you may select or be allocated a start time. To start, you will place the dibber into the start unit to start the timer.
Getting the map: Except white and yellow courses, you will get your map once you’ve started. The course will be printed in red/purple on the map with a triangle indicating the start, numbered circles showing the checkpoints (‘controls’), and a double circle as the finish. You must visit the controls in numerical order, ‘punching’ the dibber at each control. Also on the map is a list of ‘control descriptions’. This tells you what is at the control site, for example, path end or fence corner. Each control will also have a number and you need to check this when you get to the control.
Finishing: Once you’ve finished, you ‘download’ the data stored on the dibber to the results team. You will be provided with a printout of your results which will show whether you have completed the course in the correct order, your total time, and time between each control. You must download whether you have completed the course or not, as otherwise the organisers will assume you’re injured and send a search party.
Further watching
Manchester and District Orienteering Club together with the Greater Manchester Orienteering Association have produced a series of YouTube videos to help you get started:
1. Getting Started | Get Out & Go | Orienteering – YouTube
2. Getting Going | Get Out & Go | Orienteering – YouTube
3. Getting Confident | Get Out & Go | Orienteering – YouTube
4. Getting Faster | Get Out & Go | Orienteering – YouTube
Joining Mole Valley Orienteering Club
Once you’ve been to a couple of events, it might become cheaper to become a member of a club. Details of how to join MVOC are described here.